Showing posts with label Endevor. Show all posts

Sunday, January 22, 2017

Endevor : Processor and Processor group

Endevor uses OS JCL streams called processors to create executable forms of source code, including source modules, object modules, load modules, and listings. There are three kinds of processors:

  • Generate processors execute when an element is added or updated in Endevor, or generated in a stage. Optionally, generate processors execute when an element is restored or transferred to Endevor from an archive data set. Typically, the generate processor creates an executable form of the element, together with any associated outputs (such as listings).
  • Delete processors execute when an element is deleted, transferred, moved, or archived. Generally, the delete processor deletes any output that was created by the corresponding generate processor.
  • Move processors move elements from one stage in the life cycle to another. Move processors generally copy all the output previously created for the element, or re-create those outputs in the target stage.
A processor group identifies the specific generate, delete, and move processor Endevor should use to process a particular element type. It also specifies the symbolic overrides that Endevor should use in the processors' JCL. So, for example, you can write a set of processors for your assembly language programs, combine those processors into one processor group, and then associate that group with element type ASM. 
If you move or transfer an element from one processor group to another, Endevor executes the delete processors associated with the source location, not the target location. Processor groups allow you to handle common variations among the members of a particular type quickly and easily. If you create a single set of processors using symbolic parameters, you can create different processor groups using the same set of processors but containing different default symbolic overrides. For example, your site has applications coded in COBOL and COBOL/370. You could define a single type, COBOL, and have two processor groups, one for COBOL II and another processor group for COBOL/370.

Monday, April 9, 2012

Endevor: 3 scenarios for SYNCHRONIZATION errors


This topic explains three common scenarios that generates SYNC errors.

When you add your program into Endevor, that version is assigned a BASE date that will be EQUAL to the CURRENT SOURCE Date of the module you took ( do a display element and then an M to see the two screen display, hit enter to see the SECOND page, (PANEL 2 OF 2)). the BASE DATE information  looks like this:

 -----------------------------------  BASE  ------------------------------------
 USERID:  TXXAKX9    DATE/TIME: 01JUL11 06:53
                                         

This date is the CURRENT SOURCE DATE  of the element in the next highest stage, essentially. Display it and look at (PANEL 1 OF 2).  That relationship makes sense. The next highest up is your "starting point" or what your code is "based" on. From that point forward, Endevor will ALWAYS know that you code was 'based' on that code.

Here are three scenarios that WOULD cause out of sync or SYNCHRONIZATION ERRORS. All require that you 'do' something. A synchronization error ALWAYS requires that you do something.. 

1) the code 'above' yours wasn't quite right and needed a few more changes.... it wasn't perfect. That NEVER happens, right? Someone with the AUTHORITY to  make changes at that level in the lifecycle makes changes directly to it. This causes the CURRENT SOURCE DATE of that program to change. Your program was "based" on changes prior to that, WITHOUT these 'corrections' so your BASE DATE no longer is equal to the CURRENT SOURCE date of the program above it. If you try to promote that program, Endevor will tell you that the CURRENT SOURCE in the stage above is NOT what you based you program on.... Endevor is saying,  there have been changes to that upper version that you might not be aware of and may not have included in your version. If you tell Endevor to ignore that SYNC error and proceed and you have not examined and then included any subsequent changes from the upper version into your version (using PDM, for example to insure you have all the current code) , when you move your program your version will appear to be 'deleting' those "corrections" that occurred after you initially took you 'copy' of the program. You will reintroduce the reason for the correction if you do not alter you code to include that change. Once you have assured yourself that ALL corrections have been include you CAN safely ignore the SYNC error at that point. .   

2) Same setup. There is a program ahead of you, you take a copy, make your changes and add it back. Your BASE DATE matches the CURRENT DATE of the source ahead of you .Everything is fine. All of a sudden, out of the blue, the project ahead of yours is cancelled!! Pretty unlikely, huh? Well, the person who added that program DELETES it from Endevor. guess what? You program now is based on a program that doesn't even EXIST!  In the Endevor world, the simple rule that your BASE DATE does not match the CURRENT SOURCE date of the module above it is violated. A synchronization error will be issued. If you ignore it without doing a retrofit to your code, you will be 'installing' that cancelled project when you promote your module.

3) The OM team has an abend at night. They make a slight change and promote that module through the EMER path into PRODuction. In effect, they have changed the CURRENT SOURCE DATE for the highest module in the lifecycle. If anyone else was modifying that program on ANY of the paths, they will all be affected. See number 1) as the situation from here on, the resolution and actions required are the same and the danger is the same.

Examine these scenarios, try them yourself. These are then three most common situations but there are others. The main thing to remember is that relationship. Do a list element with 'search the map' .You will see that this relationship holds true always and if not, expect a SYNC error and that some 'action' will be required.

Wednesday, December 28, 2011

Find the programs impacted by copybook change


Searching for the impacted programs by a copybook change is pretty common scenario in development. Endevor has a cool feature called ACMQ (Automated Configuration Manager query)  to get this done.

Type “ACM” from the Endevor main menu. This command may be different in your installation. Now fill in copybook and other fields as shown below and press ENTER key.

---------------------------------  ACM QUERY  ---------------------------------
                                                                                
 OPTION  ===> _________________________________________________________        
                                                                               
 BLANK - Perform Element query           C - Perform Comment query             
     M - Perform Member query            O - Perform Object query              
                                                                               
 ELEMENT/MEMBER ===> MYCPYBOK                                                   
                                                                               
 ELEMENT Query Information:     Query Options:                                 
   ENVIRONMENT ===> *           Where-used/Components used  ===> WHE (WHE/COM) 
   SYSTEM      ===> *           Foreground/Batch Mode =========> F   (F/B)     
   SUBSYSTEM   ===> *           Create GENERATE SCL   =========> N   (Y/N)     
   TYPE        ===> *           Exclude circular references ===> N   (Y/N)      
   STAGE NBR   ===> * (1/2/*)   Exclude indirect references ===> N   (Y/N)     
                                Exclude related  references ===> N   (Y/N)     
 MEMBER Query Information:                                                     
   DSNAME      ===> *                                                          
                                                                               
 COMMENT/OBJECT Query Information:                                             
    ________________________________________________________________________   


You will get the below screen showing all the impacted programs by the copybook.

   Menu  Utilities  Compilers  Help                                            
 sssssssssssssssssssssssssssssssssssssssssssssssssssssssssssssssssssssssssssssss
 BROWSE    SYS11362.T172928.RA000.TSUXXXX.ACMQ.H06    Line 00000000 Col 001 080
 Command ===>                                                  Scroll ===> CSR 
********************************* Top of Data **********************************
17:29:28  ACMQ203I     LIST USING COMPONENTS FOR                               
17:29:28  ACMQ204I        ELEMENT  MYCPYBOK   ENVIRONMENT   *                  
17:29:28  ACMQ205I        SYSTEM   *          SUBSYSTEM     *                  
17:29:28  ACMQ206I        TYPE     *          STAGE NUMBER  *                  
17:29:28  ACMQ408I     OPTIONS                                                  
    LVL    ELEMENT      TYPE       ENVIRON    SYSTEM     SUBSYS     STG        
                                                                               
     1     MYCPYBOK     COPY       TESTA1     FNAC       S9000       1         
     2     TESTPGM1     BATCOB     PROD       FNAC       S9000       2         
     2     TESTPGM2     BATCOB     PROD       FNAC       S9000       2         
     2     TESTPGM3     BATCOB     PROD       FNAC       S9000       2         
     2     TESTPGM4     BATCOB     PROD       FNAC       S9000       2         
     2     TESTPGM5     BATCOB     PROD       FNAC       S9000       2         


If you want to run this in batch, then set “Foreground/Batch Mode” option to “B”


---------------------------------  ACM QUERY  ---------------------------------
                                                                               
 OPTION  ===> _________________________________________________________        
                                                                                
 BLANK - Perform Element query           C - Perform Comment query             
     M - Perform Member query            O - Perform Object query              
                                                                                
 ELEMENT/MEMBER ===> MYCPYBOK                                                  
                                                                               
 ELEMENT Query Information:     Query Options:                                  
   ENVIRONMENT ===> *           Where-used/Components used  ===> WHE (WHE/COM) 
   SYSTEM      ===> *           Foreground/Batch Mode =========> B   (F/B)     
   SUBSYSTEM   ===> *           Create GENERATE SCL   =========> N   (Y/N)      
   TYPE        ===> *           Exclude circular references ===> N   (Y/N)     
   STAGE NBR   ===> * (1/2/*)   Exclude indirect references ===> N   (Y/N)     
                                Exclude related  references ===> N   (Y/N)     
 MEMBER Query Information:                                                     
   DSNAME      ===> *                                                          
                                                                               
 COMMENT/OBJECT Query Information:                                             
    ________________________________________________________________________   
                                                                               

If you want to generate all the impacted programs, you can easily generate SCL for them. In the below screen, set “Create GENERATE SCL” to “Y” and press ENTER key

---------------------------------  ACM QUERY  ---------------------------------
                                                                                
 OPTION  ===> _________________________________________________________        
                                                                               
 BLANK - Perform Element query           C - Perform Comment query             
     M - Perform Member query            O - Perform Object query              
                                                                               
 ELEMENT/MEMBER ===> MYCPYBOK                                                   
                                                                               
 ELEMENT Query Information:     Query Options:                                 
   ENVIRONMENT ===> *           Where-used/Components used  ===> WHE (WHE/COM) 
   SYSTEM      ===> *           Foreground/Batch Mode =========> F   (F/B)     
   SUBSYSTEM   ===> *           Create GENERATE SCL   =========> Y   (Y/N)     
   TYPE        ===> *           Exclude circular references ===> N   (Y/N)     
   STAGE NBR   ===> * (1/2/*)   Exclude indirect references ===> N   (Y/N)     
                                Exclude related  references ===> N   (Y/N)     
 MEMBER Query Information:                                                     
   DSNAME      ===> *                                                           
                                                                               
 COMMENT/OBJECT Query Information:                                             
    ________________________________________________________________________   


In the below screen supply your personal PDS to store the SCL statements.


--------------------------- ACM Create GENERATE SCL ---------------------------
                                                                                
 COMMAND ===> _________________________________________________________        
                                                                               
 Action Options:                                                                
   CCID ===> ____________ COMMENT ===> ________________________________________
   COPYBACK ===> N  (Y/N)                                                      
   NOSOURCE ===> N  (Y/N)                                                      
                                                                                
 To GENERATE W/COPYBACK or NOSOURCE specify ENV/STG and optionally SYS/SBS:    
   ENVIRONMENT  ===> ________                                                  
   STAGE NUMBER ===> _                                                         
   SYSTEM       ===> ________ SUBSYSTEM ===> ________                          
                                                                               
 REQUEST DATA SET:                                                              
   PROJECT  ===> ________          APPEND ===> N  (Y/N - F/G only)             
   GROUP    ===> ________          STOPRC ===> 12  (4/99)                      
   TYPE     ===> ________                                                       
   MEMBER   ===> ________                                                      
                                                                               
 OTHER PARTITIONED OR SEQUENTIAL DATA SET:                                      
   DSNAME ===> 'TSUXXXX.TESR.SCL(SCL)'___________________                      
                                                                               

Tuesday, December 27, 2011

Endevor’s Parallel Development Manager:A Quick Guide

Overview


In a complex development environment, it is often essential that more than one programmer work on the same module at the same time.  One example of this is when one programmer is applying maintenance to current production, and another programmer is adding changes to the same program for a release three months away from production.  At some point, both programmers’ changes must be merged together.  This is not always a simple task, as direct conflicts can result from independent changes.

Endevor’s Parallel Development Manager (PDM) addresses this problem in the following ways:

1.      Allows a merged program to be created from the comparison of a base program and one or more independently modified versions of that program.
2.      Identifies potential conflicts before merging updates.
3.      Eliminates the resource-intensive and error-prone process of manually integrating changes.

PDM can be used in foreground or batch.   Its processing involves these basic steps:

1.      Buid a Work-in-Progress (WIP) file in a dataset pre-allocated by the programmer.  This file reflects the results of the comparison of the different versions of the same program.  It marks all insertions and deletions.  Potential conflicts are flagged for further consideration.
2.      Edit the WIP file to resolve the conflicts identified by the comparison.
3.      Merge the WIP file into a Merge Output File.  This is a normal source file that can be added back into Endevor, if desired.

PDM can be used to compare individual data sets, elements on Endevor, a dataset with an element on Endevor, or selected members of a partitioned dataset.

Terms


Root

The base program (or piece of code).  Not restricted to 80 bytes.

Derivation 1
A modified copy of the root.

Derivation 2
Another modified copy of the root.  Derivation 2 is optional.

Work-in-Process (WIP) File
File built when PDM compares the root and the derivation(s).  It is an annotated intermediate file which identifies insertions and deletions and also any potential conflicts.  It may be edited to remove any lines of code not desired in a final merged file.

Merge Output File
An output file created by PDM using the WIP file as input, which can be added back to Endevor.  When the Merge Output File is created, the annotations from the WIP file are removed, and all insertions and deletions are performed.


Before you start


  1. You must allocate a Work-in-Process(WIP) library with an LRECL at least 8 bytes longer than the LRECL of the files you are comparing.

  1. If you intend to use the optional merge feature, you must allocate a Merge Output Library with an LRECL the same length as the files you are comparing.

PDM Annotations


In the additional 8 bytes in your WIP file, PDM will insert annotations based on the results of the compare.  These are as follows:

%
change

?
conflict

I
line inserted

D
line deleted

n
number of the derivation (version) in which the change was found

*
comment


Here are some examples of PDM annotations:

% I-1
line inserted by derivation 1

% D-2
Line deleted by derivation 2

%D-1,2
Common deletion in both derivations

%?I-1
%?I-2
Potential conflict in both programs; inserted different lines at the same place


Example 1:  Verifying that two pieces of code are identical


In this example, a BATCHDB2 program in a pds is compared with the program of the same name on Endevor.

STEP 1:           Begin at the PDM Primary Option Menu :

                        Select Option 1 to build your WIP file.

Choose processing mode.  This example will use Batch, so an existing 80 byte  data set must be specified as well.  The control statements to execute your request will be built in this dataset.

                        Press <enter>.


STEP 2:           On the next panel, enter the name of your WIP file, and optionally
a member name.   Press <enter>.

If you leave member name blank, the default will be the name of your root member. 
Your WIP file must be at least 8 bytes longer than the files your are comparing.  For example, if you are comparing COBOL code, your WIP file LRECL should be 88.


If you are comparing 2 derivations, change the number of derivation files to 2.   No other changes are necessary.


STEP 3:           Fill in the information about your root file and press <enter>.

BUILD ROOT FROM should be D if your root is located outside of Endevor, or E if it is inside of Endevor.

You must also specify the column range you want to use for the compare.  Using columns 7-72 on a COBOL program will bypass comparing on line numbers.


STEP 4:           Fill in information about your Derivation 1 file and press <enter>.


STEP 4:           Since no member names were specified, the next panel gives you the opportunity to select one or more members for the compare.

Place an “i” to the left of the member(s) you wish to select and press <enter>.

When you have completed your selections, type the word CREATE in the command line and press <enter>.


You will be returned to the PDM Primary Options Menu.  The message “Requests Written” should appear in the upper right hand corner of your screen.


STEP 5:           Select Option 4 to Build the JCL for Batch submission, and press <enter>.


STEP 6:           On the next screen. Select Option 4 to submit the JCL.   You must also enter a valid job card.   Press <enter>.


STEP 7:           Once your job has completed, you can view the results in your WIP file.

                        If there were no insertions, deletions, or conflicts, the files are identical.


If you are submitting multiple batch compares, another way to identify any members with changes is to do a SUPERC search on the percent sign (%), which is used to flag differences.   Since there are no differences in the example above, there would be no hits on %.


Example 2:  Comparing two non-contiguous levels of a program on Endevor


This example will compare levels 7 and 11 of an element.

Repeat Steps 1 and 2 of Example 1. 

STEP 3:           On the Root Specification Panel, additionally specify a specific version and level of the program.  Press <enter>.


STEP 4:           On the Derivation 1 panel, specify the second version and level number to be used in this compare.
                                   

Repeat Steps 5 and 6 of Example 1.

The results of this compare are shown below, from the WIP library.

There are 37 records in the root version that were deleted in derivation 1.
There are 176 records in derivation 1 that are not in the root (insertions).


****** ***************************** Top of Data ******************************
000001 *************** PARALLEL DEVELOPMENT MANAGER WIP SUMMARY ***************
000002 **                                                                     *
000003 ** ROOT:         ENDN1I03/6/MC002   /S5426   /BATCHDB2                 *
000004 ** DERIVATION 1: ENDN1I03/6/MC002   /S5426   /BATCHDB2                 *
000005 ** DERIVATION 2: NOT USED                                              *
000006 **                                                                     *
000007 ** ROOT:M5XXXPOL   01.07  DER1:M5XXXPOL   01.11  DER2:NOT USED         *
000008 **                                                                     *
000009 ** NUMBER OF WIP RECORDS......    2674                                 *
000010 ** NUMBER OF DELETED RECORDS...     37,DER1    37,DER2     0,COM     0 *
000011 ** NUMBER OF INSERTED RECORDS..    176,DER1   176,DER2     0,COM     0 *
000012 ** NUMBER OF CONFLICTS............   0                                 *
000013 ** COMPLEXITY FACTOR................ 1                                 *
000014 ** BUILD RETURN CODE...............  0                                 *
000015 **                                                                     *
000016 ******* ----+----1----+----2----+----3----+----4----+----5----+----6----


Here are some of the notations.

The first three lines were inserted in Derivation 1 (not present in the root).
The fourth line was not present in Derivation 1 (present in the root).

000222 % I-1   NOV010     10 FILLER                           PIC X(01).  
000223 % I-1   NOV01      10 IP-OLD-PLN-CD                    PIC X(04).  
000224 % I-1   015800     10 FILLER                           PIC X(15).  
000225 % D-1   015800     10 FILLER                           PIC X(20).  
000226         015900                                                     


Example 3:  Merging Versions of Code


Once you have created the WIP file showing the differences in two (or three) pieces of code,  the next step is to edit that WIP file leaving only the lines that you want in the final version.

In this example, two derivations have been compared with a root.   A different line has been inserted at the same point.  The final version cannot have both lines, as indicated by the ? (conflict).   This is where the programmer must make a decision as to which value is appropriate for the final merged version.

        050800     EXEC SQL                                         
        050900       SELECT BBA_EE_KEY_ID                          
        051000         INTO :BBA-PLANENRL-BBA-EE-KEY-ID            
        051100         FROM BBA_PLANENRL                           
        051200        WHERE BBA_EE_KEY_ID  = :IP-BBA-EE-KEY-ID     
        051300          AND PLN_EFF_DT     = :WS100-OLD-PLN-EFF-DT 
        051400          AND POL_NBR        = :WS100-OLD-POL        
%?I-1   NOV01           AND PLN_CD         = :WS100-OLD-PLN-CD     
%?I-2   NOV01           AND PLN_CD         = :WS100-OLD-PLN-xx     
        051500     END-EXEC.                                       
        051600                                                     

The programmer decides that the line inserted in Derivation 1 is the one that should be
retained.

Using ISPF edit, he deletes the second line leaving only the first.

        050800     EXEC SQL                                        
        050900       SELECT BBA_EE_KEY_ID                          
        051000         INTO :BBA-PLANENRL-BBA-EE-KEY-ID            
        051100         FROM BBA_PLANENRL                           
        051200        WHERE BBA_EE_KEY_ID  = :IP-BBA-EE-KEY-ID     
        051300          AND PLN_EFF_DT     = :WS100-OLD-PLN-EFF-DT 
        051400          AND POL_NBR        = :WS100-OLD-POL        
%?I-1   NOV01           AND PLN_CD         = :WS100-OLD-PLN-CD     
        051500     END-EXEC.                                       
        051600                                                      

The WIP file is now ready to be merged.  You should have a Merge Output Library
allocated in which the merged code will be placed.  The record length of the Merge
Output Library should be the length of the final merged code (8 bytes less than the WIP
file)


STEP 1:           From the PDM Primary Option Menu, select Option 3, Merge.
§         Select the processing mode (foreground or batch).
§         For batch processing, specify a dataset where the request statements will be built.
§         Press <enter>.


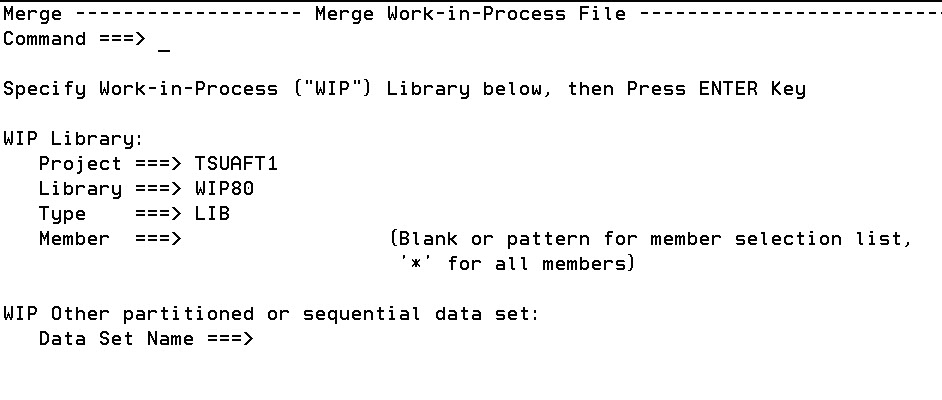
STEP 2:           Specify the name of the WIP library, and press <enter>.


STEP 3:           Specify the name of your Merge Output Library and press <enter>.


STEP 4:           Select the members you want to merge and press <enter>.


STEP 5:           When all members have been selected, use the END PF key to return to the PDM Primary Options Menu.

                        Select Option 4 to build the batch job  and press <enter>.


STEP 6:           On the next screen, select Option 4 to submit the batch job and press <enter>.


STEP 7:           A report of statistics from the merge will be under the C1MSGS1  ddname in your job.  Here’s a sample from that output:

                    *----------------------------------------*                
                    *     Beginning MERGE of WIP member      *                
                    *----------------------------------------*                
                    WIP:            TSUAFT1.WIP80.LIB                         
                    Member:         M5XXXPOL                                  
                    OUTPUT:         TSUAFT1.MERGE80.LIB                       
                    Member:         M5XXXPOL                                  
13:12:03  PDM0064I  MERGE operation is complete.  Return Code=0000            
                                                                              
                    ****    Detailed Statistics Follow    ****                
                          Total records in WIP:           2658                
                          Total records in output:        2621                
                          Total invalid WIP records:         0                
                    ****     End of Detail Statistics     ****                 
                                 

   WIP Data set........... TSUAFT1.WIP80.LIB                           
   MERGE Output Data set.. TSUAFT1.MERGE80.LIB                         
                                                                       
                                                                       
      WIP        MERGE         Number of Records  Invalid  WIP Member  
     Member      Member    RC    WIP      MERGE   Records  Disposition 
   ----------  ----------  --  -------   -------  -------  ----------- 
   M5XXXPOL    M5XXXPOL     0     2658      2621        0  KEPT        
                                                                       
   MERGE Summary:                                                      
    Number of members:                                                 
      Selected for processing........     1                            
      Successfully processed.........     1                            
      Deleted from the WIP dataset...     0                            
      With REPLACE conflicts.........     0  (Not processed)           
      In error.......................     0                            
    Highest MERGE return code .......    00                            
**************************** BOTTOM OF DATA ****************************


STEP 8:           You can now add the merged member back into Endevor.